- Ambient Lighting
- Bulbs and Accessories
- Fog Lights
- Headlights
- Off Road Lights
- Tail Lights


-
 Free & Fast delivery
-
Payment security
24 Support
$499.99Pair
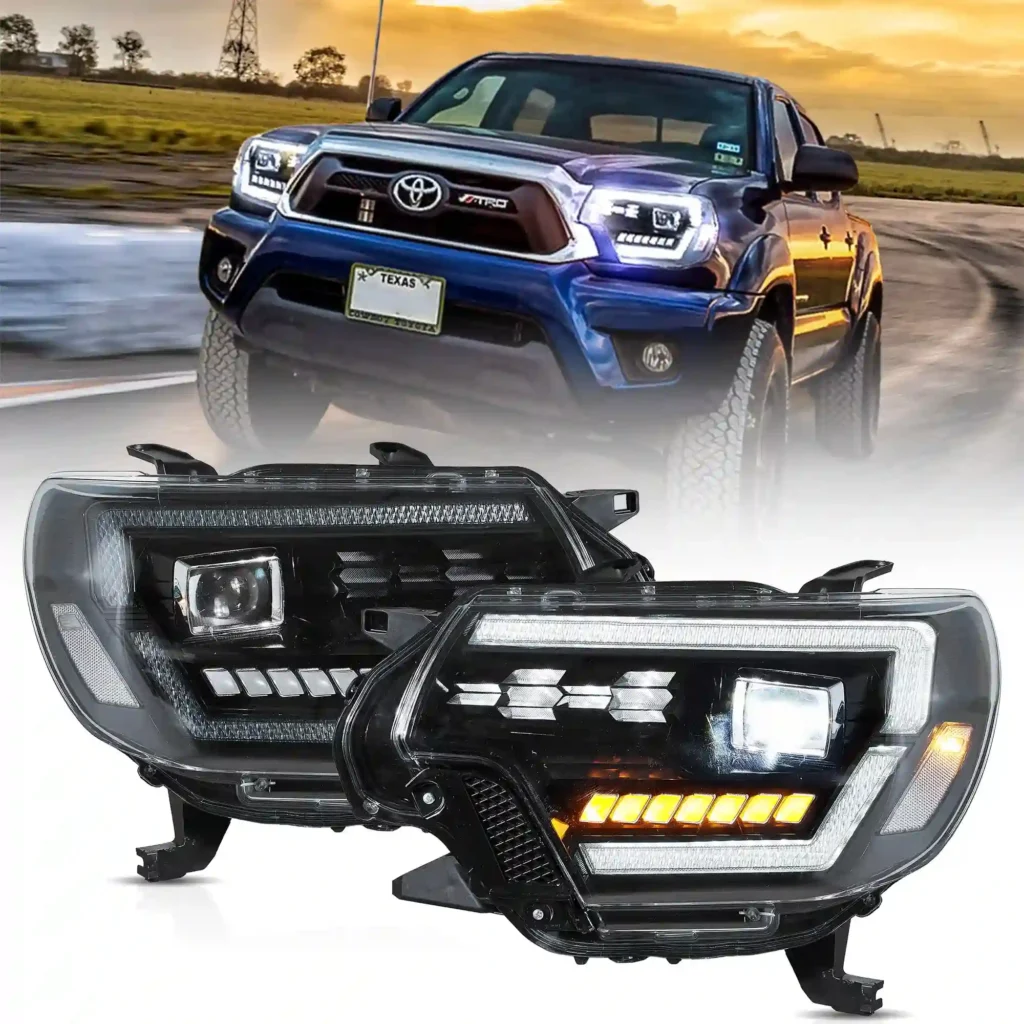
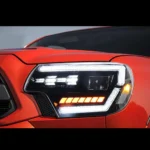
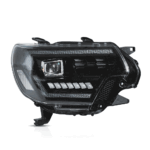
【Fit for】2012-2015 Toyota Tacoma Headlighs. A direct replacement for the original parts, with no splicing required. The instruction manual is included for easy installation.
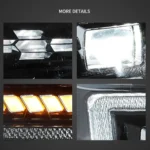
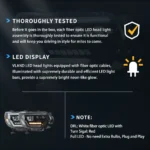
【Design】Upgrade Your 2012-2015 Tacoma With LED Headlights – No bulbs needed. Enjoy dynamic animation and sequential lighting that comes to life the moment you turn on your headlights. Featuring Dual Beam Projector technology, these 2012-2015 Tacoma LED Headlights deliver superior brightness and focused light for enhanced visibility. Whether adding a touch of distinction or customizing your Tacoma, these 2012-2015 Tacoma LED headlights are engineered for a perfect fit and are considerably brighter than stock. Each unit undergoes rigorous quality testing, ensuring an air-tight seal. These in-house manufactured LED headlights not only look better but also last longer than traditional halogen lights.
【Replaces OE Number】
Payment Methods:
| Weight | 23.4 lbs |
|---|---|
| Dimensions | 30 × 22.5 × 10.85 in |
| Compatible Make | |
| Compatible Model | |
| Part |
Headlights |
| Installation Location |
Front, Driver And Passenger Side |
| Quantitly Sold |
Kit |
| Brands | |
| Headlight Type | |
| Replacement |
Fit For Toyota Tacoma 2012 2013 2014 2015. |
| Housing Type | |
| Housing Color |
Black |
| Lens Color | |
| DRL |
LED (White) |
| Bulbs |
With Led Bulbs |
| High Beam |
LED (white) |
| Low Beam |
LED (white) |
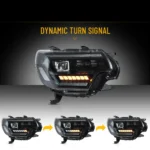
| Turn Signal |
LED (Yellow. With Sequential Indicators) |
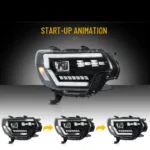
| Headlights Animation |
Start-up Animation |
| OE/OEM Part Number |
OEM #: 8115004180, 8115004220( Left Driver Side) 8111004180, 8111004220( Right Passenger Side). Partslink #: TO2502213, TO2502232; TO2503213, TO2503232. |
| Warranty |
1 Year |
| Wiring |
This item has the same connections and wires With the original HeadLights. |
| Package includes |
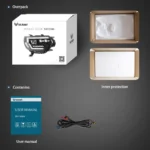
User manual*1, One pair of Headlights (include left side and right side) |
Premium Headlight & Tail light Upgrade Kits
Gravida turpis placerat tristique conse ctetur a condim entum nostra aliquet adipis.
Gravida turpis placerat tristique conse ctetur a condim entum nostra aliquet adipis.
VLand specializes in high-performance automotive lighting solutions, offering DOT/SAE-certified LED headlight and taillight assemblies designed for seamless plug-and-play installation.
We strive to provide you better auto parts shipping options.
1. Order the Product and Specify the Delivery Method
2. You Will Receive an Order Confirmation Email
3. Wait for Your Order to Arrive
4. Pick up Your Order at The Checkout Area
All parts are qualified and tested by the strictest aftermarket-part standards.

If the front of your vehicle is its "face", then the headlamps have long been considered the vehicle's "eyes". Everyone notices them. One of the most distinctive changes you can make to the face of your car or truck is to replace the factory headlamp assemblies with a custom set. Your ride will take on a personality all its own, and will gain a distinctive appearance that will set it apart from all the other look-alike vehicles on the road.
Lumen headlamps are designed to fit in the exact location of your factory units and cost less than you might think. In the scope of this article, we'll review the step-by-step basics of installing complete headlight units designed for your specific vehicle.
For any new part, headlights, or otherwise, it's always a "best practice" to start by unpacking the components and verifying that everything is in good shape. For your new headlamp assemblies, remove them from the box and ensure that there is no physical damage.
If your headlights have single wires for DRL or halo lights, touch these wires (red or white are usually positive, and black is usually negative) to a 12-volt source such as the car battery to ensure that all lights function.
Make sure that everything you ordered is included, and if the light manufacturer included their own installation instructions, use them along with this guide.
Tools needed: flat wrenches, socket wrenches, rivet gun (on certain vehicle applications), screwdriver(s), Torx head bits (if applicable), electric drill (if applicable)
This is often the first step because many modern vehicles require the plastic front bumper cover to be slid loose an inch, or completely removed in order to access the anchor points where headlight assemblies bolt on. If you're not sure whether this step is needed, we recommend checking with your vehicle manufacturer or accessing a repair manual online. Removing and re-installing the front bumper cover is relatively easy because most are designed to unbolt and slide off with basic hand tools.
Taking a close look at the bumper cover, you'll notice that the bolts which secure it in place are typically exposed once you open the hood. They can also be found underneath the vehicle where the bumper cover meets splash shields and near the edge of wheel well openings where wheel well liners meet fenders. There may also be small plastic caps or clips covering such bolts, so remove them with a small flathead screwdriver.
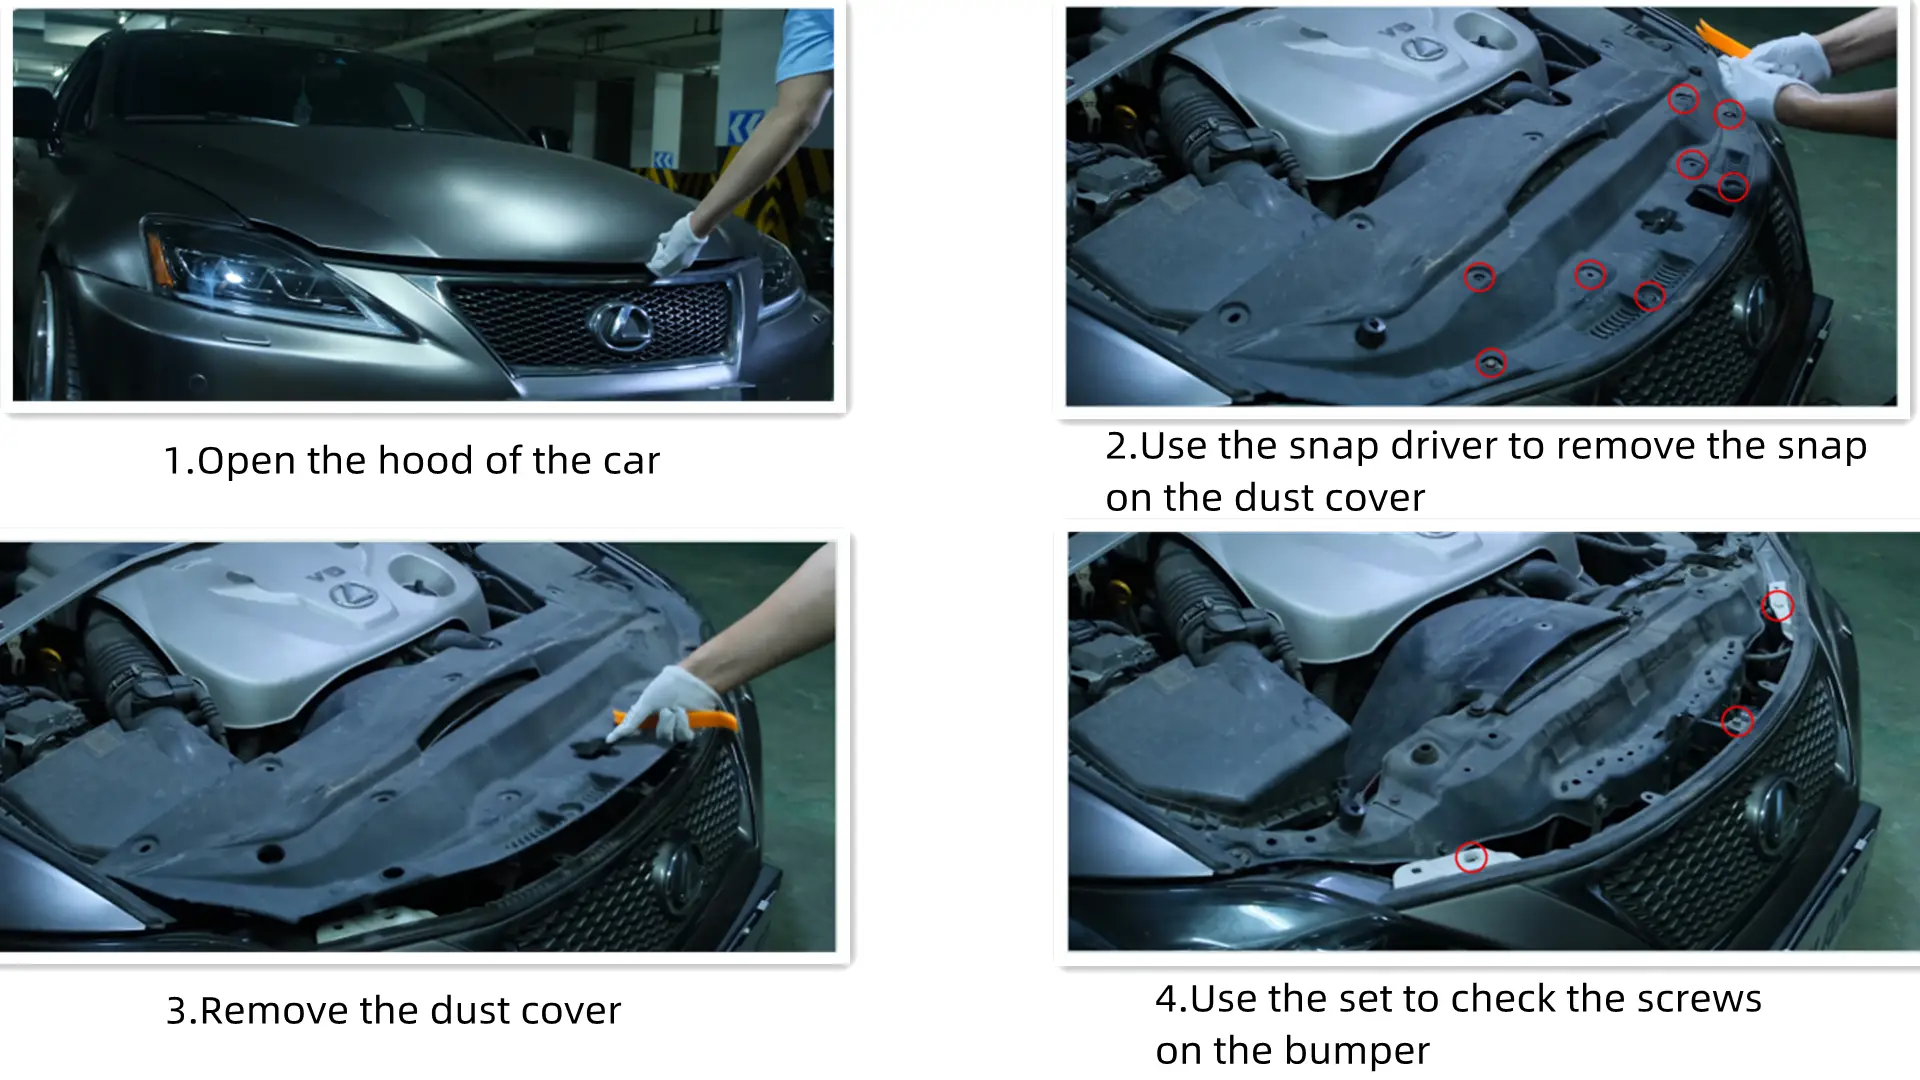
Remove the bolts themselves with an applicable socket wrench or flat wrench. In the event your vehicle manufacturer has used rivets to secure things (wheel well areas), they'll need to be drilled out with a traditional drill. Then you'll need a rivet gun to reinstall new ones - not an expensive purchase, but the proper tool to use. When drilling out rivets, bits designed for drilling into metal are most suitable due to a higher heat rating.
Once all fasteners are removed, the bumper cover can be detached. Many are designed to slide horizontally along special bracket pieces mounted underneath before coming completely loose, so move the bumper cover in this fashion first if you aren't able to obtain specific instructions on your make and model.
Tools needed: Socket wrench, screwdriver(s)
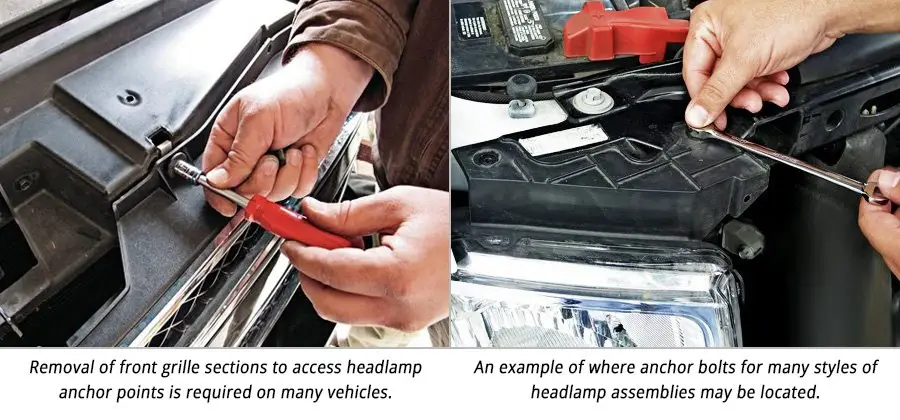
Depending upon the year and model of your car, you may need to remove your vehicle's front grille section in order to access bolts or clips that secure the headlight assembly in place. This can be done by removing the screws from the top or sides of the grille and/or by releasing hold-down clips found on some vehicles with a flathead screwdriver.
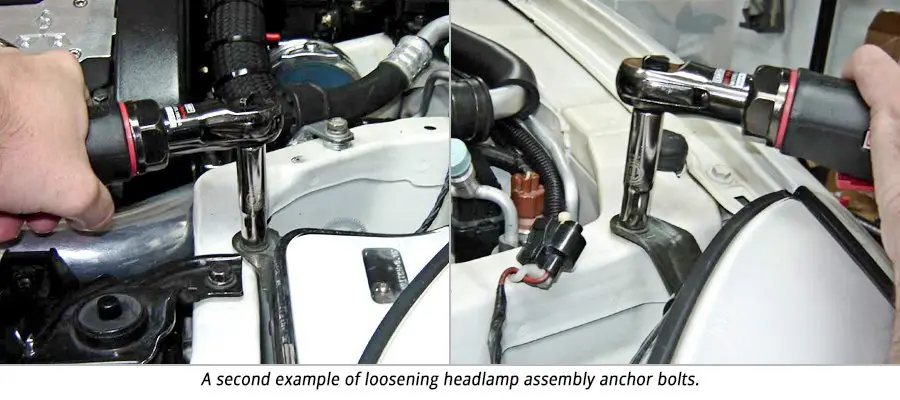
Once any grille, trim, and bumper cover sections have been removed in order to provide access to headlamp assembly attachment points, you can proceed with unbolting them - usually a small socket wrench serves best for such applications. Look for hold-down bolts in the metal body panels above and to the side of your headlamp assemblies. Some vehicles also feature hold-down clips on the headlamp assembly which can be released with a flathead screwdriver.
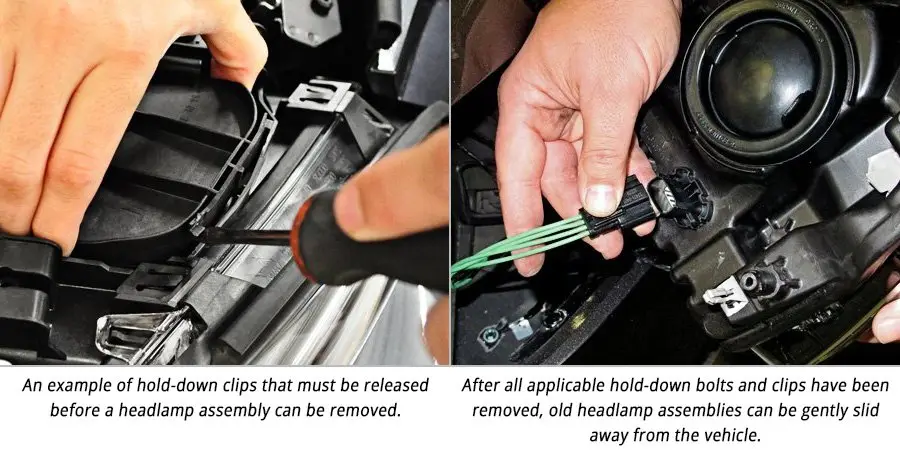
After all applicable hold-down bolts and clips have been removed, it's time to slide your old headlamp assembly away from the vehicle - wiggling it gently as you go. Remember, unless you disconnected them earlier from behind, electrical wiring harnesses are still attached. Don't remove any bulbs from your factory housings just yet. Set your OEM headlamp assemblies aside, in the event that you wish to reinstall them one day, for example, if you decide to sell the vehicle.
Tools needed: Wire stripping tool, wire connectors, pliers (if applicable), electrical tape
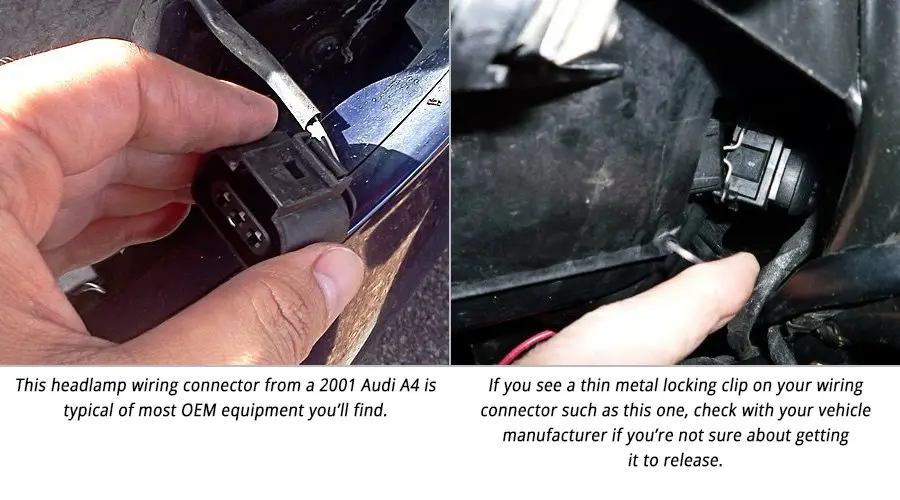
Once you've pulled the old headlamp assembly away from the vehicle a short distance, it's time to get a full look at wiring harnesses that are attached. Even if you've removed one or more connectors from the rear of the assembly before unbolting it, there may be others (such as separate wires to side marker bulbs) still attached which were previously obscured. Once you can see everything, unhook any and all electrical connectors from the back of the headlight assembly. Usually, either a simple squeeze on the edges of the connector or pulling up on a tab is enough to cause the connector to release its grip, but if a thin wire bar is present, it usually needs to be slid into an unlocked position first. If you're not sure how a locking clip is designed to release, it's best to further research instructions for your make and model.
You are now ready to begin installation of the new lights. We will make all of the electrical connections first, while we have access to the backs of the assemblies. Then we will perform the mechanical install into the front of the car's body.

Custom headlight assemblies we sell are designed to fit into your specific vehicle as easily as original equipment,with mounting points that match you make and model’s existing specifications.
Depending on your year and model car, plus the design of the new custom lights, you may need to transfer some bulbs. In general, the new light will include low/high beam headlight bulbs. In many cases, the turn signal (incandescent) bulb is not included in the new assembly. This is very easy to rectify. You will need to remove the signal bulb from the old lamp (do NOT disconnect any wires) and install it, in its existing housing, into the new lamp. There may be a paper sticker which needs to be removed first.
Both your old and new headlamps have low and high beam headlamps. When you removed the old units, you disconnected an electrical plug from the car or truck's wire harness. On the new assembly, you should find an electrical plug shaped exactly like the plug on the old assembly. This portion of the electrical installation is called 'plug-and-play' because you literally only need to connect the new plug into the existing harness. If you have purchased lamps without any additional lighting elements like halos or LED lights, you are done with the electrical installation.
Connecting to Parking/Running Lights
STEP 1. First, locate the parking lights on your vehicle Headlight housing.
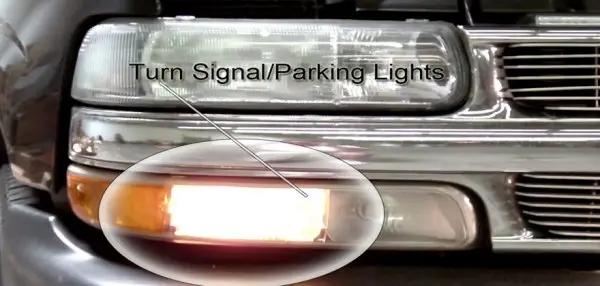
Some Parking lights come with two (running lights, ground) or three (running lights, turn signal, ground) wires.
To determine which wires are what on the Parking lights, we use a volt meter.
The volt meter has a positive(red) and negative(black) needles.
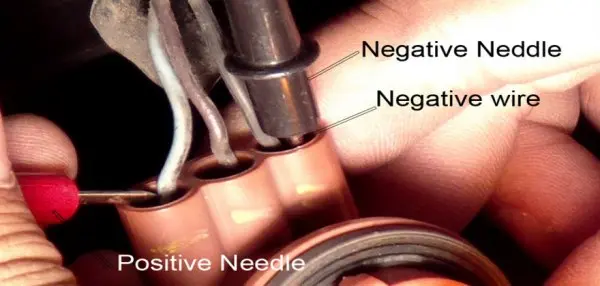
STEP 2. First turn on the parking light and signal on. Then Pinch the Negative needle to a ground or negative wire(as shown). Then Pinch the Positive wire to one of the color wires on the turn signal.
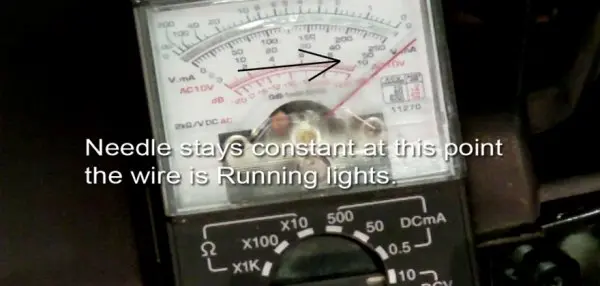
STEP 3. To understand how to read the volt meter in simple term: When the needle stays constant on high voltage, the wire that was pinch is a Running/Parking light. Meaning the parking light on your vehicle stays on whenever the lights are turned on.
CAUTION! If the needle bounces on the meter, the wire is a turn signal. The voltage to the turn signal pull high and low in order for the turn signal to blink.
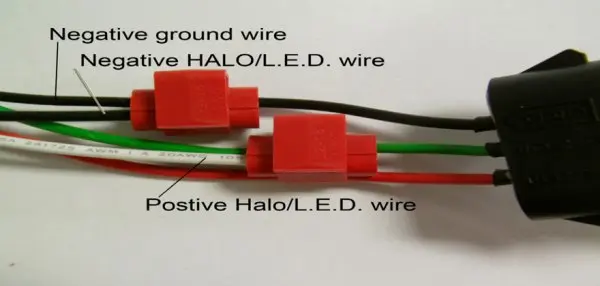
STEP 4. Once you locate the running wires, use the quick connects and connect the CCFL/LED Positive wires to the running lights. Negative wires to the negatie wires on the Parking Lights.
Before putting the headlight back on, check the CCFL/LED’s make sure they all lid up.
STEP 5. Install CCFL/LED Headlamp into the car.
Tools Needed: Tape measure, masking tape
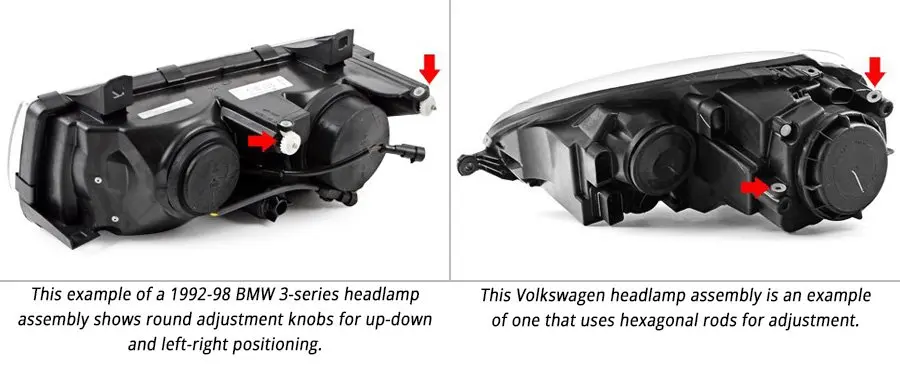
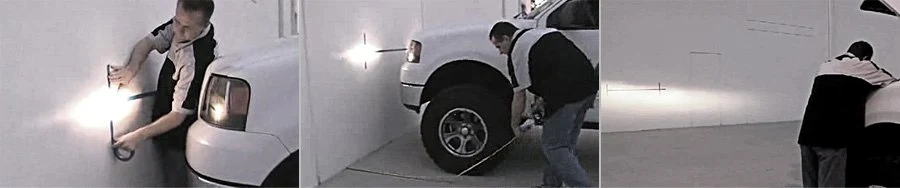
Knobs, screws, and fittings on the back of headlamp assemblies that adjust headlight aim vertically and horizontally can vary greatly from design to design. Once you have the tools you need to rotate the specific adjustment knobs on your headlamp assembly in hand, grab a roll of masking tape and a 25-foot tape measure as well. We'll help you aim your new headlights without any complex or technical equipment.
To do so, find a white wall and a level surface to park on - you can do this inside or outside, but the ground must be level and the wall flat and vertical. Measuring carefully, mark exactly 3.5 feet up from the bottom of the wall. Make two marks, and run a piece of masking tape horizontally across the two marks. The tape should be as wide as the vehicle plus an extra 2 feet per side.
Park the car so it's exactly 25 feet from the wall to the face of the headlamps—don't estimate. Begin to adjust the low beam using the adjusters on the back of the headlight assembly so the beam shines 3.5 feet high on the wall.
We leave you with these words of wisdom: while we consider the installation of a set of custom headlamp assemblies a "DIY" affair, this kind of work is not for everyone. If you have had experience working on your own car, you will likely be comfortable performing this task on your own. If you are new to the hobby and want to give this a try, please use this article as a guide. You may also want to search out additional information on the Internet. If for any reason you are uncomfortable tackling this, please enlist the help of a professional. Whichever path you choose, have fun with the project, and enjoy the new custom lights on your ride!
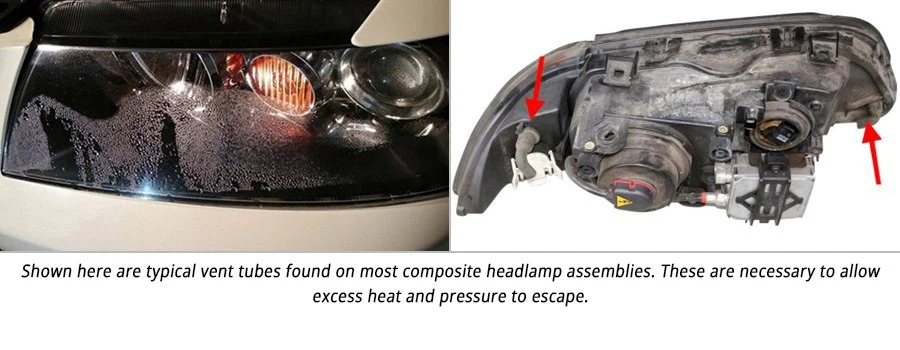
The quick answer to this questions is no. Condensation buildup inside a headlight assembly is normal, and it occurs for a number of reasons. First, vents along the top and bottom of the headlight housing are necessary to equalize pressure differences that would otherwise cause the entire assembly to crack and fail. Hot headlight bulbs create high pressures inside the headlamp assembly, and temperature differences only increase as lens cover surfaces cool from direct airflow contact at speed.
Condensation does not mean that a headlight assembly is defective, and the presence of fogging or misting due to condensation is not considered a valid reason for warranty replacement of the entire headlamp assembly.
After hot, pressurized air has worked its way out of the headlight through the vents, humidity can get drawn in from the outside. So, headlights that have been on during hours of driving become fogged on the inside because their cool temperature creates a low-pressure area that actually draws moisture in. This condition is made worse by high outside humidity, and by colder outside temperatures during winter months.
Condensation inside the headlamp assembly can also occur in other situations such as a car wash. And it can occur even when headlights bulbs are not turned on. For example, a car that's been driven in the daytime and parked can develop condensation as residual heat leaves the engine and warms the back side of the headlight assembly.
While most condensation in the headlight lens usually dissipates after approximately 20 minutes of driving with the low beams switched on, some small and insignificant areas of the lens may remain misted for a little longer. A normal amount of water condensation inside the headlamp assembly will not affect the optical functions of the headlight in any way, and will not cause any parts or wiring to corrode. To minimize condensation buildup inside the headlight, make sure any dust boots or covers are on tightly. Also make sure that the headlight vents are not blocked, which could prevent condensation from escaping.
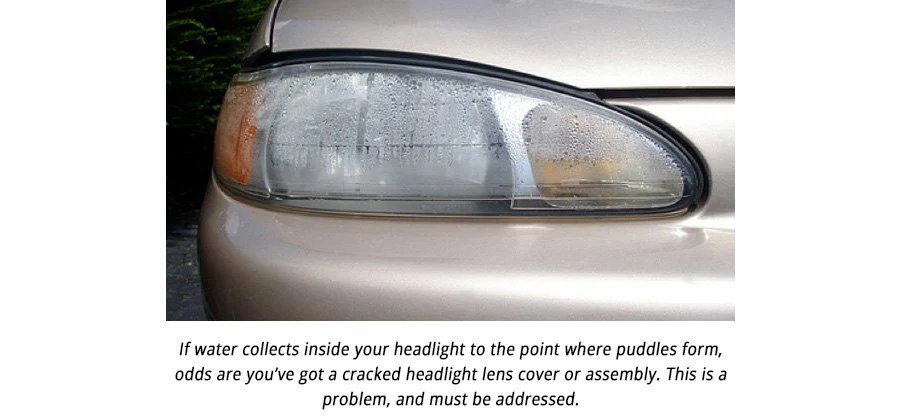
If water collects inside your headlight to the point where puddles form, odds are you've got a crack in the headlight lens cover. Water can also leak in because of improper seals around dust boots where bulbs are inserted. If no cracks or holes are visible around the edges of the headlight, the problem could be the housing itself. If you can visibly locate a crack, it's best to repair it with sealant.
Customer Reviews

Fast and reliable delivery

Consumer protection program

PayPal / Credit Card

Many years on the market